Makes one 9-inch tart
Skill Level: Advanced
Ingredients
Tart Crust
- 250g (2 cups) all-purpose flour
- 35g (1/3 cup) almond flour
- 105g (1/2 + 1/3 cups) powdered sugar
- 1 big pinch of salt
- 127g (9 Tbls.) cold butter, cubed
- 50g (1 medium) egg, beaten
- 1-2 Tbl. cold milk
Lemon Curd Filling
- 150g (3/4 cup) granulated sugar
- 12g (1.5 Tbls.) cornstarch
- 4 whole eggs
- 3 egg yolks (save the egg whites for the meringue)
- Zest of 2 lemons
- 160g (2/3 cup from about 4-5 lemons) lemon juice
- 170g (1.5 sticks) butter, softened
Italian Meringue Topping
- 6 egg whites
- Pinch of salt
- 350g (1.5 cups) granulated sugar
- 4-5 Tbls. water
Special Notes Before You Start:
- The tart crust dough needs to rest 2-3 hours in the refrigerator prior to rolling it out.
- After putting the lemon curd through a sieve, make sure to add the softened butter while the curd is still warm.
- IMPORTANT: After adding finished lemon curd to tart shell, make and add the meringue topping while the curd is still warm. This helps the meringue adhere to the curd as well as prevents excessive weeping. When the curd is cold and the meringue is hot, condensation can form between the layers causing separation and weeping problems.
- It’s handy to have a torch to brown the meringue, but if you don’t have one, you can use your oven broiler. Just watch it VERY CLOSELY and rotate tart to avoid hot spots.
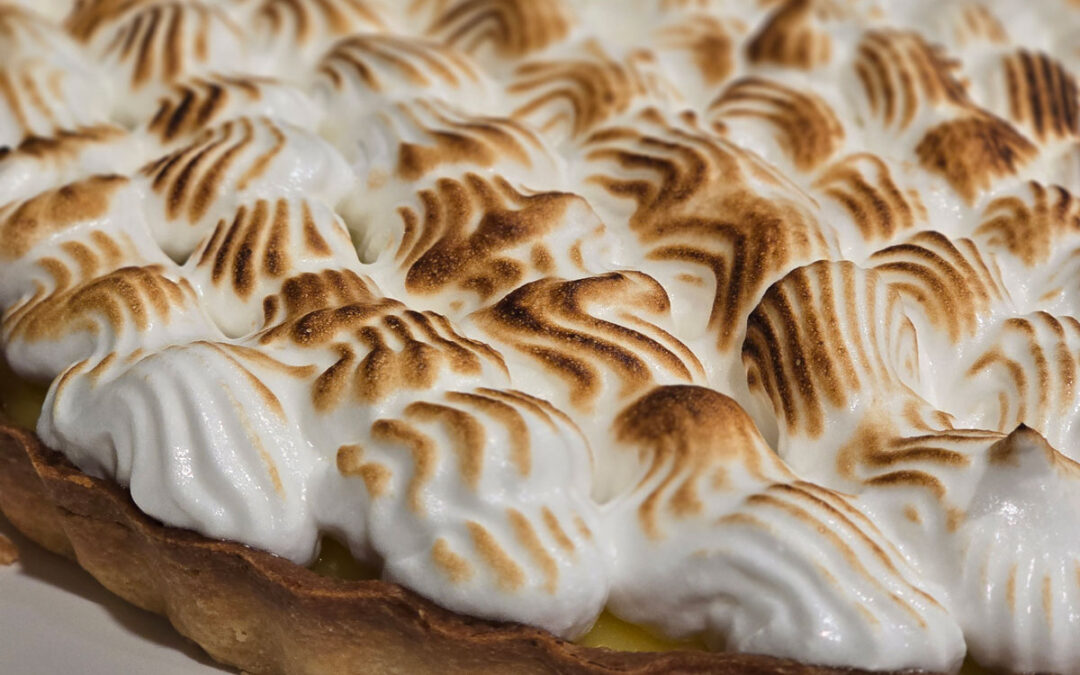
- You will need a piping bag and tip to make the top of the tart look like the photo above. However, it’s not necessary. You can simply pile the meringue on top of the lemon curd filling with a butter knife, making decorative swooshes to make it look pretty.
- Italian meringue is the most stable of the meringue types and using this type will prevent the meringue from ‘weeping’ if you can’t serve the dessert immediately.
Instructions
Making The Tart Crust
- Preheat the oven to 350ºF (175ºC).
- To your Kitchen Aid mixing bowl, or if by hand a regular mixing bowl, combine both flours, powered sugar, and salt. Mix until combined.
- Add cubed cold butter to the bowl and cut the butter into the flour mixture with a pastry cutter or fork until it resembles coarse crumbs (another way to describe it – it looks ‘sandy’).
- Mix in beaten egg and add milk 1 tablespoon at a time, only enough to bring the mixture together into a dough ball.
- Do not overwork the dough, less is more to keep the tart crust tender and flaky. Work it just enough to form a disc of dough. Wrap in plastic wrap and place in refrigerator for 2-3 hours minimum.
- Remove the dough disc from the refrigerator. Lightly dust a sheet of parchment paper, a rolling pin, and the tart pan with flour. If anything starts to stick while you’re rolling out the dough, unstick it and apply more flour.
- Use the rolling pin to flatten out the cold dough starting from the center working outward. Rotate 90º and do it again.
- Roll out the dough to about 2-3cm thickness using the same technique in step #7, starting from the center working your way out to the ends of the dough disc and rotating the dough 90º to achieve a consistent thickness. If the dough becomes too soft at any point, place it in the refrigerator or freezer for a few minutes to firm it up.
- Once you have an even thickness, roll the dough gently onto your rolling pin and unroll it over your centered tart pan. Lift the dough around the edge of the pan and push down into the raised edge so the dough can run up the sides of the pan and not crack. If it does, use some of the excess dough to patch any cracks or holes. Use your finger to press the dough into the fluted edges of the pan so your crust will have a nice fluted edge after baking. Use the rolling pin or a sharp knife to trim the excess dough from the top lip of the tart pan.
- Using a fork, dock the dough on the bottom of the pan generously.
- Place the crust in the refrigerator or freezer to firm up completely, about 15-20 minutes.
- Crumple a sheet of parchment paper then smooth it out and set it in the bottom of the prepared tart pan. Add pie weights (or beans, or rice) on top of the parchment.
- Bake tart crust for 10 minutes, remove the pie weights and parchment, then finish baking for another 5-10 minutes (depending on the size, thickness, oven, etc.) until the tart crust is nice golden brown. Rotate the crust as it cooks for even browning. Don’t take it out until it is on the darker side of golden brown. Undercooking the crust allows moisture from the filling to seep into the crust, making it soggy instead of crisp.
- Cool baked tart crust on baking rack while you make the lemon curd filling. The tart crust does not have to be completely cooled before the filling is added.
Making The Lemon Curd Filling
- In a small bowl, whisk together sugar and cornstarch until well mixed with no lumps of cornstarch.
- In a medium saucepan, whisk together whole eggs and yolks until well beaten.
- Add sugar/cornstarch mixture to saucepan and whisk until combined.
- Zest lemons directly over the saucepan and add lemon juice. Mix to combine.
- Place saucepan over medium low heat and whisk continuously for up to 10 minutes until mixture thickens. You want to whisk continuously because eggs cook faster than the sugar melts and you will end up with much more cooked egg bits in your curd if you do not continuously whisk. The mixture will be liquidy for a time at the start, then suddenly begin to thicken quickly. DO NOT put this on the burner and walk away without whisking or you will need to start over! Keep cooking the curd until bubbles form on the bottom of the pan, then remove from heat immediately.
- Using a spatula, transfer the curd from the saucepan into a sieve placed over a mixing bowl. Use the spatula to force the curd through the sieve and into the mixing bowl. You may need to scrape the curd off the underside of the sieve with the spatula. Because of the thickness of the curd, it may take 5-10 minutes to push all the curd through the sieve. Bits of cooked eggs will be left in the sieve and should be discarded. NOTE: This step is often listed as ‘optional’ in most Lemon Meringue Tart recipes, however, I’d say the ONLY way this step is optional is if you don’t have a sieve. Doing this step will improve the texture of your curd tenfold.
- Using a hand mixer, add the softened butter to the cooled-but-still-warm curd and beat until soft and fluffy. Alternatively, transfer the curd into your Kitchen Aid mixing bowl and beat until smooth.
- Remove the tart crust from pan by placing it on a raised cake plate and letting the tart pan edge ring drop down off the tart crust.
- In the center of your serving platter, place a small dollop of curd; this will prevent your finished tart from sliding off your serving platter. Then slide the crust onto the center of your serving platter and off of the remaining pan bottom plate. If the tart crust is cooked long enough, it should be easy to move into place. Undercooked tart crusts are prone to breaking when removed from the pan.
- Once the crust is properly positioned on the serving platter, spoon the curd mixture into the tart crust and spread evenly. NOTE: Adding the meringue topping while the curd is still warm allows the curd and meringue to better adhere to one another. For this reason, move directly to making the meringue next rather than making the meringue at a later stage and adding it atop chilled curd. If you must make this recipe in two stages, make the crust as Stage 1 and make the curd and meringue as Stage 2.
Making The Italian Meringue Topping
NOTE: This can be slightly tricky to do with a hand mixer; if you have a Kitchen Air mixer with a whisk, it is easier to do.
- Place egg whites in mixing bowl or Kitchen Aid mixer with whisk attachment in place. Add a pinch of salt to the egg whites and start beating them until fluffy with stiff peaks.
- At the same time, in a small saucepan, add the sugar and water and stir to combine.
- Place saucepan over medium heat with a candy thermometer placed in the sugar water. If you don’t have a candy thermometer, you can take the temperature of the sugar mixture with an instant-read thermometer at several intervals, once the sugar mixture starts to bubble. Once it reaches 248ºF (120ºC), remove the boiling sugar from the heat.
- With the mixer running, pour a steady, small stream of the boiling sugar liquid into the whipped egg whites, being sure to incorporate the egg whites from the edges of the mixing bowl. Continue until all the sugar liquid is incorporated and mix for 4-5 minutes longer to cool down the meringue just a bit before piping. NOTE: If using a mixing bowl and hand mixer, place the mixing bowl on a damp kitchen towel to prevent the bowl from moving as you mix. You will not be able to hold the mixing bowl in this step since you’ll need one hand to operate the hand mixer and the other to hold the saucepan.
- Fit a decorative piping tip of your choice (fluted is shown) inside a piping bag. Scoop the meringue into the piping bag and twist the top of the bag shut to prevent the meringue from coming out the top and to push the meringue down to the tip end.
- Starting down the centerline of the tart, pipe a decorative line of meringue from one end of the crust edge to the other. Continue piping parallel lines of meringue on one half of the tart. Rotate the tart and pipe parallel lines down the other half of the tart.
- Using a torch, singe the meringue slightly and evenly over the entire meringue top layer to brown the meringue.
- Refrigerate until ready to serve. Serve within 24 hours from finishing.
Recent Comments