I clipped this recipe out of a Family Fun magazine back in 2009 when my kiddos were still in elementary school. I always made them as classroom treats on Groundhogs Day which is my favorite holiday. Some say this is odd favorite but when you live through Chicago winters, you really do need another holiday in February to help you over the winter hump.
Additionally, Groundhogs Day has none of the hustle and bustle of that other winter holiday that claims to spread so much joy. All this holiday requires from it is some hot beverages and mild anticipation while you wait for the said rodent to appear from its hovel. For my money, these cute little Groundhog cupcakes, which I’ve modified slightly from the original magazine clipping, are just what one needs to weather through the cold, dark days of February.
Yield: Makes 12 cupcakes
Ingredients:
- Homemade or 1 box of chocolate cake mix, makes 1 doz. cupcakes
- Homemade or 1 can pre-packaged frosting, white/vanilla, frosts 1 doz. cupcakes
- 12 Pepperidge Farms Milano OR Nabisco Nutter Butter cookies, more for insurance
- 1 large pkg. milk chocolate Almond Bark (found in most grocery store’s baking aisle)
- 12 whole almonds
- About 5-7 pcs. pink colored saltwater taffy (found in Valentine’s Day candy section)
- About 12 pcs. white colored saltwater taffy (found in Valentine’s Day candy section)
- Black decorators gel
- 48 brown M&M’s (I usually buy 1-2 large bags of all colors and snag just the browns, eat the rest!)
- 1 pkg. (9 oz.) Nabisco “Famous Chocolate Wafers”, crushed
Instructions:
Make cupcakes per your own recipe or per the package instructions. Set aside to cool.
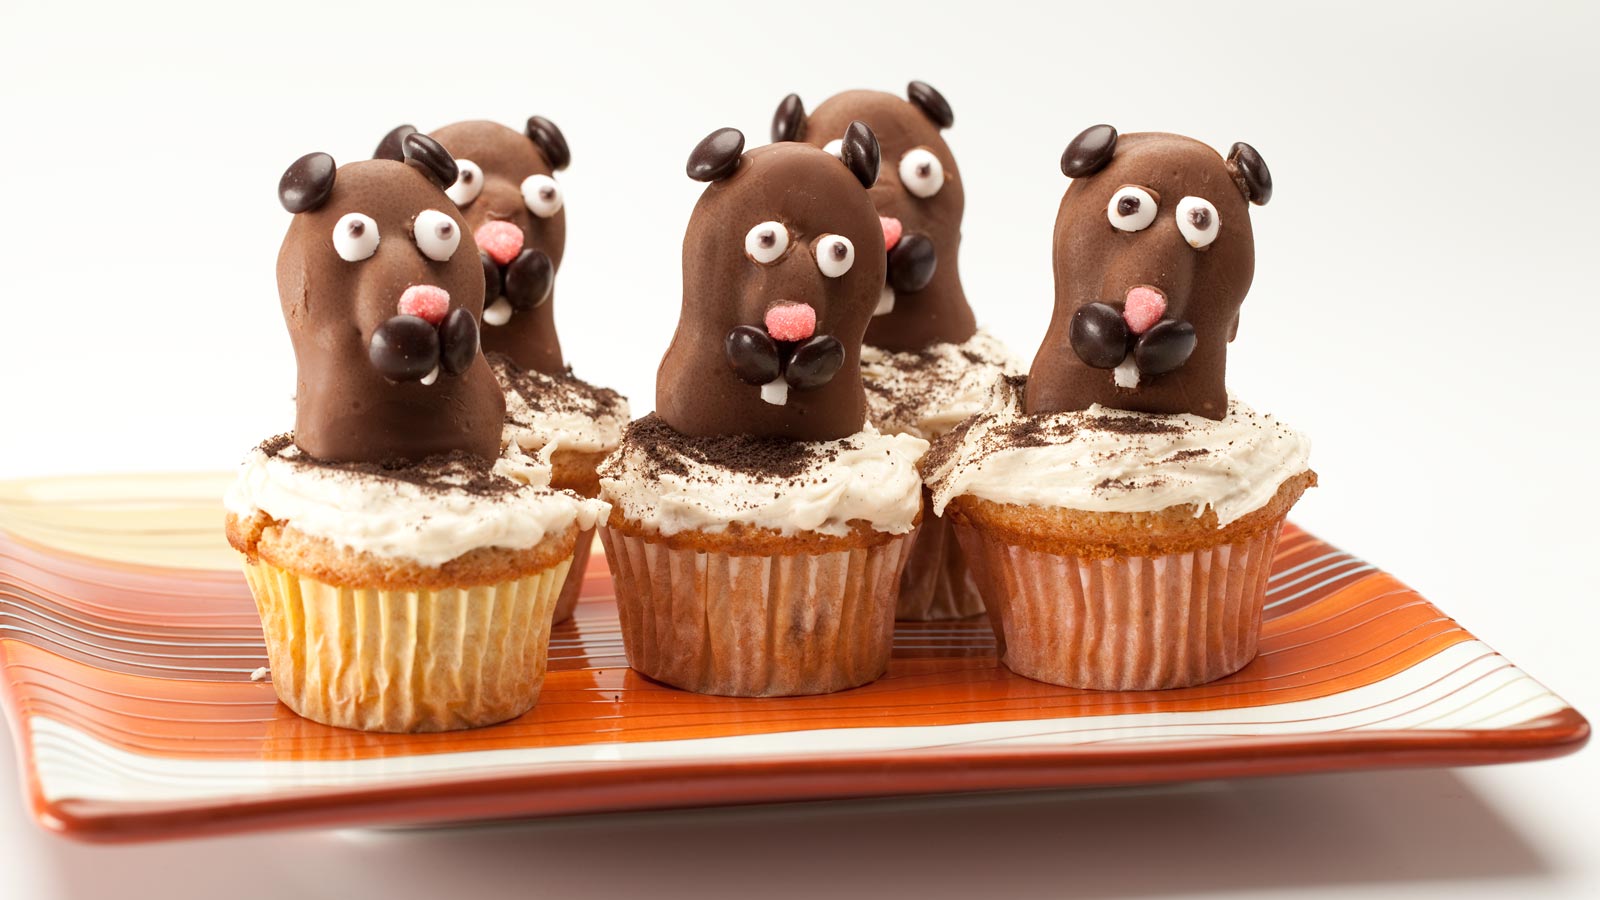
To assemble the groundhogs, melt the almond bark in a shallow bowl. Place each cookie, with whole almond placed on upper half, in the melted chocolate using a spoon to cover the cookie/almond with chocolate, and a fork to scoop the cookie out of the bowl. The almond will form the groundhog’s snout. Give the forked cookie a few light taps on the side of the bowl to drip off any excess chocolate. Place on waxed paper to harden and cool.
Next, place each color of the saltwater taffy in the microwave for about 15 secs, just enough to soften it slightly. (times with vary with various microwaves) Pinch off small pcs. of pink taffy and shape into 12 rounded triangular-shaped noses using your two index fingers and one thumb. Set aside to cool. Pinch off small pcs. of white taffy and shape into 24 rounded eyeballs, about the size of your pinky fingernail. Set aside to cool. Take the rest of the white taffy (reheat slightly if needed) and roll into a long, slim roll. Using a knife, cut about 1/4″ long pcs. This will be the groundhog’s tooth.
Using melted almond bark, spackle the backs of two M&M’s and adhere atop the whole almonds with the two M&M’s placed next to each other to make the groundhog’s cheeks. Hold in place until almond bark cools and hardens. Do the same for the pink nose, adhering it above and in between the two M&M cheeks. Do the same for each white taffy eyeball, placing them at 10 and 2 o’clock at the top of the almond mound. Next, adhere the white taffy tooth, again with a tiny bit of melted almond bark, to the underside of the two M&M cheeks. Finally, adhere the last two brown M&M’s to the top edge of the cookie at 10 and 2 o’clock to form the groundhog’s ears. Once taffy is completely cooled and using the black decorator gel, make a small dab atop of each white eyeball to form the groundhog’s pupil.
To assemble the cupcakes, using a paring knife cut a small rectangular hole in the top of each cupcake about 1″ deep and discard the cutout. This is to house the groundhog cookie into the cupcake without splitting the cupcake. Next, frost each cupcake with white frosting being careful to not completely fill the hole you just created. (some frosting in the hole is OK) Put the crushed chocolate wafers into a shallow bowl and using a spoon while holding each cupcake sideways over the bowl, spoon a small amount of chocolate wafer ‘dirt’ atop the white frosting. Arrange the cupcakes on a serving platter and stick in an assembled groundhog into each cupcake.
Pro Tip: When handling your cutout cupcakes, make note of the direction of the cutout. Set the cupcakes on the platter with all the cutouts facing the same direction so you don’t have to guess if the groundhogs are in the correct orientation.
Another Pro Tip: DON’T COVER! I covered them once with a domed lid and when I uncovered them in the morning, the decorator gel had ran down each eyeball and they looked more like Groundhog Zombie Cupcakes. Wrong Holiday!
Recent Comments